Saturday, June 25, 2016

Front Wheel rebuild (Raleigh Super Course Part VI)

Today it was time to tackle main bearing #3 - the front wheel.  I wish it was as easy as going from this
Before
To this
Finished

But sadly this isn't an episode of bewitched and I can't just wiggle my nose and have everything taken care of, there is some work involved.

My first step is taking all the old rubber off; tire (in this case dry rotted), tube (patched a few times), and rim strip (in ok shape).

bye bye old rubber
Then it was on to doing the first round of cleaning off the rims with some Simple Green and a tooth brush.
Before

Getting started
And of course the hub..

Filthy

coming along

Fortunately the inside of the rim is in good shape so I won't need to worry about cleaning out rust, sometimes water will be trapped in the rim and leads to rust, but not in this case.
Rust free
Before I get too far into cleaning the rim and hub I like to get the hub pieces apart so they can have a nice bath in the sonic cleaner.
Cones, Axle, washers, lock nuts, covers & bearings

I am getting rid of (recycling) the bearings but everything else gets a sonic bath.  For bearings its time for some new ones -ten 3/16th bearing on each side of the hub.


And with all the hub components removed I can begin cleaning up the cups.

Dirty
Shiny
And of course I have continued to work on the rims too and have moved from Simple Green to steel wool.


When I started you couldn't see the engraved writing under all the grime.  Now that the bearing parts have had a nice long soak they are mostly clean.


One thing to watch out for in rebuilding wheel hubs is a bent axles, usually its the rear that gets bent as it takes the most stress but its always good to check and in this case the front is fine.  A little more cleaning of the parts above and add in the new bearings and I am ready to go with rebuilding the hub.


Just like with the headset and bottom bracket don't go easy on the grease.


As with the other bearings you want to find the sweet spot between too tight and too loose - the Goldilocks principle.   Now its on to the new rubber, first a new rim strip.


And a new supple Kenda K35 tire.


I line up the inflation info above the hole for the tube stem, a little anal I know but what can I say.  I like to inflate the tube just slightly, one stroke of the pump, so it has just a bit of shape which makes it easier to place into the hollow of the tire casing so its less likely to get caught in a pinch flat.


I did take one break while working on the front wheel today.  I had a request from my Daughter and ex-Wife to take a look at their bikes, having been stored all winter/spring in an enclosed space under the front porch they needed a once over before they'd be ready for summer riding.

Momma bear and baby bear
Since I built both my Daughters bike and the ex's bike its only fitting that I give them a tune up.  A little lube on the chain, air in the tires and a check of brakes and shifting and they are ready to go for some summer fun.

Until next time...Ride.Smile.Repeat.

Thursday, June 23, 2016

Throwback Thursday; S24O on the Olympic Penninsula

I have been reading the Pondero blog recently, which I stumbled across courtesy of Anniebikes, and its got me thinking about S24O's as in Sub 24 hour overnight, an idea popularized by Grant Peterson of Rivendell bicycles.  That in turn got me thinking about the first, and only, S24O I did back in 2012 before I even started this blog.
West Seattle Ferry
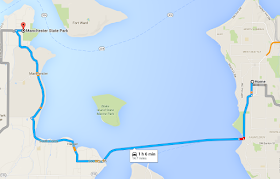
In retrospect my trip was a bit ill conceived,  I had this itch that I wanted to try an S24O but I waited until into October to do it, I just picked the closest park I could find with camping, and I started off late in the day.  I was fortunate in one sense that despite my waiting till October we were having a nice Indian summer that year so the temps were nice and mild and it was dry.  Also from my house to Manchester state park was only 14 miles away and about 3 of those miles were covered by the Ferry so I didn't have to travel too far.


The route


Normally when I head down toward the West Seattle Ferry dock I take a right and go into Lincoln park, the forested area in the picture below, to ride the waterfront trail that goes from asphalt to gravel and offers some variety while giving spectacular views of Puget Sound and the Olympic range.
This time though I got on the ferry and enjoyed the nice 30 minute ferry ride to the Peninsula.  I have almost exclusively great memories related to rides on Washington State Ferries as they usually involve; travel, escape, time spent with friends and family and of course great views. 


Where leaving late came back to bite me was that although I had plenty of light while riding from the Southworth dock to the park, by the time I arrived light was starting to fade.


I had also failed to take into consideration that the camp sites were in the forested section of the park so with the fading light and the forest canopy it was essentially dark by the time I started setting up my tent.  I actually set up by the light of my front bike lighting.  I had purchased a cheap one-man tent earlier in the year in anticipation of doing some bike camping but setting it up for the first time in the dark wasn't really part of the plan.
I did, in the end, manage to get the tent set up and since it was so dark I just went to sleep.  It would have been nice to have a campfire to sit reflectively by but I didn't have the room to bring wood with me-nor would I have wanted the weight- and I didn't get to the park early enough to scope out if there was a place to buy/collect some.  When I got up in the morning I simply packed up and headed back home. 

my little mule

After the fact I looked at the Manchester Park website and realized there were lots of things I could have done, hiking, wandering the beach, historic buildings etc.


Some things I didn't see
 Looking back I also realize with a bit more planning I could have probably found a diner someplace in the vicinity for a hearty breakfast and a little local flavor but I just hightailed back to the ferry and home.  In summary I am glad I did it and learned I could pack all the basics on the bike and gained a few lessons of what not to do along the way, so I expect my next S24O experience to be a bit more planned out.


Until next time...Ride.Smile.Repeat.

Saturday, June 18, 2016

A Brief ride on the 2016 Novara Mazama Road bike

lets go for a spin

As my time moonlighting as a cashier at REI draws to a close I decided I would take a test ride on the new Novara Mazama after my shift was done today.  I have seen this bike in the store and read about it online and since its a chromoly steel frame I figured it would be right up my alley.  Full disclosure this was at most a 5 minute ride so take the following with a grain of salt, not an exhaustive test ride just my impressions after a short jaunt.

Stock photo 3/4 view

One of my first impressions was how light this bike felt.  According to the specs it comes in at 25.6 lbs which to most modern roadies will probably seem like a ton but I ride a bike with rack, panniers, 36 spoke alloy wheels w/stainless steel spokes so by comparison 25 lbs seems light, and it was pretty common for bike boom "sport" road bikes to come in around this weight.


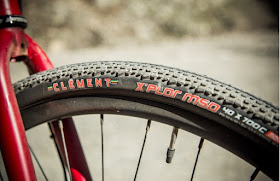
My second impression was how smooth the ride felt.  I am used to smooth riding steel bikes but this felt downright buttery on my brief ride.  It does have some nice fat Clement X'plor MSO 700x40c rubber but I'm not sure that explains all the smoothness of this ride and I am used to riding on 700x47c rubber so it not like its new to me.

One thing that comes up a lot in this bikes review are the bars, which people either love or hate.  They are basically a Novara version of the Salsa Woodchipper bars. Now I like wider bars and ride Rando bars on my main bike so count me in the love camp.
Cockpit view

They are probably not for everyone but bars are easily swapped.

Side view of bars
As you can see this bike uses bar end shifters which I also like.  They come with Microshift brand bar ends which I have heard mixed reviews of, but in my shifting I had no issues.  To be serious though after so much time on a 1x9 set up I am not sure I would know what to do with 30 gears!

One of the features of this bike that intrigued me was the mechanical disc brakes (TRP Spyre mechanical disc), not exactly new tech at this point but not something I have ever had on a bike.  In my short time I didn't torture test them but I did put them thru a couple sudden stops and they seem solid.
Modern grabbers

One thing I would change are the wheels, no fault of their own really, they are perfectly fine Alex 32 spoke wheels.  My super clydesdale booty (um 250+ lets say), however, is used to 36 spoke wheels and although you wouldn't think 4 spokes per wheel is a big deal I was getting audible spoke ping when  I did hard braking.  Photo below courtesy of Patrick O'Grady at Mad Dog Media
Super Clydesdale


Now while I am still an employee I could get a sweet deal on this already reasonably priced bike, but I am not really in a financial position to buy a new bike right now and frankly I have trouble finding time to ride the bikes I do have so it wouldn't really make sense.  If I was looking for a gravel grinding multi chain ring commuter though I would give this bike serious consideration.  I think one of the reasons I like it so much though is probably because it reminds me of my Handsome Devil.
Mazama in gravel mode

Until next time.... Ride. Smile.Repeat.


PS you can find a real professional style review of this bike here at Bicycle Times

UPDATE:  In July I happened to notice the Mazama was discounted down to about $750 for the Large size -good for me- as they were clearing out their stock.  I flirted with idea as I like this bike but I can't really justify it despite the great deal.  And then in September I saw that REI is dropping the Novara brand and going in a different direction - see article here so long Mazama we hardly knew ya.


Sunday, June 12, 2016

Getting my bearings.. (Raleigh Super Course Part V)


Today was headset day, but before I get ahead of myself I need to do some waxing first.


Last week I did the paint cleaner coat and this week I finished off with the polish and finally the carnauba wax, I haven't done the chrome polish yet but will before we get to the wheels.

So with the wax done it was time to get the headset back together.  First a light greasing of the parts..

Then I use the headset press to get them back in the frame, oh sure I could use a piece of 2x4 and a hammer but I paid good money for this tool and I am going to amortize it!
imPRESSive
And just like that the upper bearing race and lower bearing cup are back in the frame.

Then its on to getting the lower race back on the fork.

And once again I could go all DIY with getting the fork crown race seated, but I have another bike tool to amortize so bring in the bearing race setter.


Raise up the long piece and bring it down sharply!

And now its time to put those bearings to work, I got this park tool magnetic bowl as a novelty and if I recall as a way to boost an order total up to the free shipping mark many moons ago.  I am glad I did as it comes in handy especially for bearings as they stay where you put them.


Then I like to put down a nice bead of grease because grease is the lifeblood of bearings and it also helps them stay in place while you put everything back together.
Upper race

Lower race

And then it was time to get things all back together grease the cups, especially the top one so its ready to screw back on after you thread the fork through the head tube.


My friend Joe also asked me last week about going to more upright "north road" type bars so we are going to switch from a road racer drop bar bike to more of a sophisticated upright gentleman's urban bike.  As I talked about last week I had procured a different bar and stem for the drop bar look but I can use those on a couple projects I have in the queue so I got a new Origin8 stem for this bike that was a little longer with a slightly shorter reach to work with the upright bars.  I find that the stem plug is often rusty when I work on older bikes so I like to make sure that part gets a generous coat of grease.

Its also important to make sure you get the stem down so that the writing and the minimum insert line aren't showing.

All snugged up including the new cable guide.


Since I was on a roll and I had all the parts of the bottom bracket cleaned up I got it reassembled too.  I like to grease the threads in addition to the cups.


Same deal as the headset you want to be generous with the bearing grease and it helps hold the bearings in place while you are reassembling everything.  The spindle is degreased, cleaned up and ready to get new grease to the bearing races before reassembly - the long end goes on the drive side as it allows room for the chain rings.

The drive side cup gets screwed all the way in, and yes that's another bike specific tool getting put through its paces.


The non-drive side cup is called the adjustable cup, and it's where you make your um.. adjustments. Once everything is where you want it you finish it off with the lock ring, yep got a tool for that too.


I have come across some different approaches to adjusting bearings.  My friend Hugh, a bike refurbisher in Michigan refers to it as "no slop, no grind".  My version of this is "the Goldilocks principle" not too tight, not to loose but juuussst right.  It takes some practice but eventually you get a feel for it.  Some folks advise tightening until things stop turning freely then back off a bit.  Any way you slice it, you don't want the adjustment so loose you have play or so tight things don't turn freely. 

coming together

I have received a number of new parts in the mail this week including this set for the cockpit. The two on the right, stem and brake cable guide already got mounted.

Goodies
I also realized that with the new handlebar set up I would need an upper cable stop for the down tube.  In the stock set up you don't need one because that's where the shifters go, but I am moving the shifters up with the new configuration so I needed a cable stop.  In addition to making nice stems Origin8 also makes a nice silver cable stop in the right size and since it had arrived, I put it on.


all snugged in place
So some nice progress this week, next on the list will be the wheels to complete the round of replacing the rebuilding the main bearings, two down and two to go.  Until then....Ride.Smile.Repeat.