Saturday, March 17, 2018

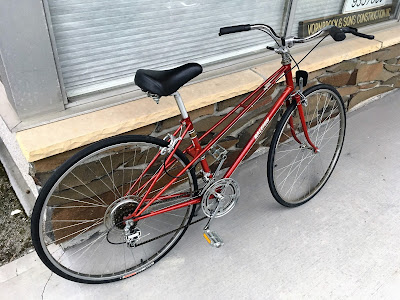
No Illusion, its Finished! (1973 Motobecane Mirage)

I learned recently that the Hindu god Ganesha is the remover of obstacles.  He could have been my mascot for this build.  The first obstacle was me, after doing a lot of work on the Mirage during the July 2017 bike blitz I couldn't find the motivation to tackle the wheel hubs.  I had done the; tear down, frame clean up & wax, bottom bracket, headset, brake pads and brake mounting but I let the wheels derail me.


With the right tools, cone wrenches, taking apart a hub is pretty straightforward, and then its all elbow grease and sonic cleaners to get the parts cleaned up.  For the rear hub I decided to leave one cone in place thinking it would be faster to put everything back together and get it adjusted.  Wrong.  During the disassembly the cone had actually moved so I had to remove it anyway to get the cones correctly centered on the axle but the keyed washer for that cone was stuck and required an overnight with some liquid wrench to come loose.  Then when trying to reassemble things, one cone had a hard time screwing onto the axle, after spending time cleaning the axle threads I realized there was a bur on the cone threads! I finally got everything where it needed to be but my short cut turned out to be a long cut.  I also had the all to common issue in adjusting both hubs in that everything was great until I tightened the lock nut and my no slop/no grind adjustment went to heck and the end product had too much play.  After doing this three times I changed my strategy and made the initial adjustment too tight (grind) and after I tighten the lock nut it was just right.  He can be taught.


Since I was working on the hubs that gave me a chance to clean up the filthy FW and spoke guard.  I could have probably just replaced the freewheeel but the teeth were in good shape and I was trying to do this rehab on the cheap.  It got a WD-40 bath, a wipe down between the cogs and 3 in 1 oil in the creases on the back.


When I was getting old wheels ready for scrap I made sure to save as much as I could, one old rear hub was a great template when I had to re-space the cones on the Mirage rear hub and when I discovered the front skewer was missing a spring I had a spare to use.  And finally, I had finished the set of wheels that had been holding things up for so long.


I also found a place for the rack off the Gitane Tour de France, I had tried it in other places but couldn't find a fit until the Mirage, which was good because I had misplaced some key pieces for the pletsher rack it came with.


I have had this bike for nearly three years and worked on it intensely last July, but it wasn't until last week I realized it had cool MB branded bar end plugs.  I kept the original bar tape because it still looks great and it saved me some time and $$.


Back in July I had the foresight to label the drive side cotter pin so I would remember where they should go back.  I could have replaced the cotter pins but again I was trying to this rebuild on the cheap and since I use a cotter press the pins mostly come out in good shape.


My next obstacle was the non drive cotter pin, something didn't feel right as it went in and then it was in tight enough that I couldn't just pull it out.  I though I would need to spring for a punch to remove it but thought to give an old drill bit a try and it popped right out.  As I write this I wonder why I didn't just use the cotter press to back it out....bleary thinking I guess.


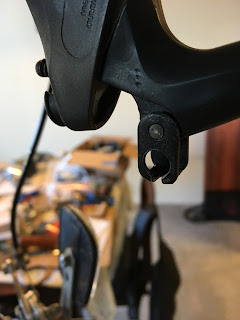
You can see the cotter acquired a crease on the lower part of the ramp about dead center of the pin from going in slightly off kilter which is why it felt "wrong", some work with a file and then carefully aligning it got it back in and finished off the cranks.


aligning the rear brake cable guide


When dialing in the brakes I found my 3rd hand tool to be very valuable.  When I was tightening the seat post clamp the rear cable guide, which has the seat post bolt pass through it, got out of alignment with the rear brake.  I used a piece of wood and the mallet to "persuade" it back into the right line.

I'm screwed

After getting the new chain installed, I didn't totally cheap out!  I noticed a potential issue.  The rack screw was protruding, could be a problem...test....yes its a problem, interferes with the chain.  Some spacers on the outside of the rack solved the issue and I didn't even have to take off the rear wheel.....yet.

While testing the shifting I noticed the chain was getting bound up in the largest FW cog, not sure if somewhere the RD or FW was changed from the original but it was not going to work..sigh.


Fortunately I A) used a chain with a master link B) have Park Tool Master link pliers -MLP 1,2 and C) had a new in package SunRace RDM10  rear derailleur.  In theory you can take a master link chain apart without tools but I find that the pliers save a ton of aggravation.  You can see that the Simplex RD has a very short cage which I think was the main issue.


New RD installed and working like a champ with no binding.  I really like the SunRace RDM10 because it's cheap, 10 bucks, and it looks the vintage part, and it works.  In my post on Sunday I said I was close but not quite there.  After getting the shifting sorted I found the following; the brakes weren't dialed in to my liking because the wheels need more truing, both front and rear, the headset was loose and the rear rack wasn't quite level.  Since it was late Sunday I hung it up at that point.  I then had my first week in a new job and didn't get time to address those issues until Friday.  


I was using the cable and housing spares I had and since I had some Jagwire shift housing I used it to make the gold pin striping and lug lining pop a bit.  I didn't get the rear rack totally level and would have needed to remove it to accomplish that, its good enough.  Finally she is done and on CL.

Until next time.  Ride.Smile.Persevere.Repeat.

Sunday, March 11, 2018

Almost, but not quite, there


The plan for today was to finish the 1973 Motobecane Mirage, but first I was going to ride to the farmers Market.  It was sunny and 60 degrees today so I was wanted to enjoy the weather.


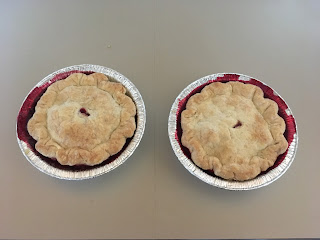
There were tiny pies to be purchased and eaten later with the girl (Bumble berry).

pFreim Triple IPA

And tiny beers to be sampled at the Beer Junction, a great start to my Sunday.


After getting a start in July of last year, I have been working on the Mirage for much of the last three days and it is very close to being ready to list but I have a couple things left and I am calling it quits for the day.  Since it was so beautiful out I did take the opportunity to take a few pictures.  This isn't the most troublesome build ever but nor is it the easiest and I will have a tale to tell once it is truly finished.  I felt my break was well deserved.


Until next time; Ride.Smile. Repeat

Saturday, March 10, 2018

And then there were three

Ok that isn't actually true yet but it's the goal, get down to three bikes in the whole apartment;

Those three will keep me plenty busy as the last two both need the complete overhaul/spa treatment, and even the HD needs new bar tape and a few tweaks.


The pictures above are from June of 2017 and chronicle the height of the bike zaniness,  it can be tough to see it all but there are; two complete mountain bikes, two complete road bikes and five frames, as well as various wheel-sets occupying my humble balcony.


The pictures above reflect how things look today, just a bit of a change.  What happened to all the stuff you ask?

  • The 1978 Schwinn Traveler and one wheel set remain in the on deck circle- a project in waiting
  • The 1980 Raleigh Rapide is completed and listed on CL for sale
  • The Green 1973 Motobecane Mirage is in the work stand and is close (fingers crossed) to being done and will be sold on CL.
  • The Yellow Motobecane Mirage frameset was sold along with a few french parts and a wheel-set.
  • The 1960 something,Torpado Alpha Frameset and all its parts were sold as a project and I threw in a bunch of new consumables; tires, tubes, cotter pins, cables, etc.
  • The 1984 Nishiki Cascade was sold with new tires as a project.
  • The 1986 Miyata Trail runner was sold - the guy traveled 50 miles just to get the stock wheel-set.
  • The wheelset from the 1974 Nishiki Professional with the sanshin high flange hubs got moved inside and if I am dumb enough to buy a frame only project down the road they will be ready.


The last two residents of the balcony along with some wheels and rims and various metal bits went to the scrap yard (sad trombone).

I did harvest many parts from both of the bikes above some of which have been sold on and some of which may appear again soon in a future project.  For the Nishiki Professional as an example, I kept the wheel-set, and the seat post and saddle, while the stem, shifters, and derailleurs got sold. The Sugino bottom bracket and crankset I may also clean up and sell.  I should have never bought that bike but I think I at least broke even.

Some of these projects have been lingering for 5 years and it was cathartic to clear them out.  It also didn't hurt to put some $$ in my pocket.  I still have two projects I want to complete before tacking the Nishiki Cresta GT,  and after that I have the long overdue MotoGT to give a well deserved overhaul, so I am far from out of the woods.  After I get through all that I hope to take more of a one at a time approach to my rehab projects.  We'll see how that works out... lol. 

in the workstand

Until next time. Ride.Smile.Don't hoard.Repeat.

Sunday, March 4, 2018

A somber goodbye and an Impulsive Hello!


A few weeks ago, reluctantly, I put the Schwinn Passage on Craigslist.  I made sure the price was at a I don't want to sell this but if you meet my price I will be ok with it level.  There was no action in the first week and then I got some interest from a young man who arranged to see it on a Saturday.  The day before on Friday I got a call I had been waiting a long time for, a Job offer!  A lack of job was the reason the Schwinn was on the block and I considered cancelling the ad and telling the guy the Passage was off the market.  Although I had an offer I wasn't going to start right away or get paid right away either and I had a good feeling about the potential buyer so I went ahead with the meeting. The guy and his wife drove up from Joint Base Lewis McChord (about 50 miles) and when he saw the bike I heard him say under his breath, it looks even better than the ad, and I knew I had made the right choice.  He was very excited to buy it and I was excited to fill up my wallet.

I now had a  job in the offing, projects completed and listed on CL, and a hole in my quiver, I have been working hard to clear the decks of bike projects, frames and parts that I will probably never get to..BUT...I really liked having a mid 80s Japanese touring bike.  Maybe I will just take a peek at CL, nada, hmm wonder what's for sale on Bike Forums these days.


Catalog shot
On bike forums I see that there is a 1987 Nishiki Cresta in 58cm which is my size but it says local pickup only.  I click the post for a closer look, the seller is in Portland, Oregon, that is not too far down the road, my old stomping grounds and home to numerous friends and family, that could work.  And wait a sec the logo the seller is using on his Bike Forums profile is familiar....I think its the same as the logo for The Simplicity of Vintage cycles blog, the same blog that got me so obsessed with Vintage Japanese Touring bikes that I went in search of a Schwinn Passage.  So I PM the seller, is this Josh of blog fame? and he emails me back asking if I am the guy who runs the Ryan's Rebuild blog, small world!

Now I am still technically unemployed and cash strapped so I don't commit right away but I keep my eye on the listing, ping my Portland friends, who are Oregon Ducks and live in the Hollywood district btw, to see if I could stay with them on the off chance I come to Portland for the weekend.  I find the 1987 Nishiki Catalog online and start obsessing.


Ok who am I kidding, of course I am going to buy it!  I get up early Saturday and drive down to Portland, meet up, get a tour of his very nice, and clean!, shop and seal the deal.  And now I am the proud owner of a 1987 Nishiki Crest GT touring bike that is nearly bone stock.


I have many more pictures here and I will probably do another post just on all the cool features of this bike but for now I just wanted to follow up on my tease from a few days ago and share the new addition to the stable.


I just completed the Raleigh Mixte and the Motobecane Mirage has been over half done for 8 months so I want to get it completed on CL soon.  I have one other potential quick and dirty project after that and then the decks will be cleared.  Then I can start the rehab on this lovely Nishiki, maybe in time to do the Tour de Lopez for the second consecutive year on my second consecutive mid 80s Japanese touring bike.

Ride. Replace, Smile. Repeat.

Friday, March 2, 2018

Moving on from a Mixte

I have discovered something about myself and Mixtes.  When I'm building one for someone, like a sister in law, or niece or daughter, I enjoy the process.  When I am building one on spec, not so much.


I found the above Mixte at bike works in September of 2015, it was $32.50, it was all there, the paint and decals were in good shape, sold.  I really disliked the bars for some reason,  too much rise I think, and I quickly replaced them with a Wald bar with 2.5 inch rise.  I had picked up a set of grips at the sale as the ones on the bike had seen better days and the new ones were a buck.


I wasn't wise in the ways of rubber grips then and I don't think I prepped them very well and they only ended up going on about half way.  For some reason I let that defeat me, the bike got put aside, then put outside where it languished for at least a year.  It was on a covered porch but it still allowed the new bars to start to get some surface rust - bad Ryan!!


Last fall as unemployment wore on I brought the bike back in, thinking I could fix it fast and sell it, that was in October.  I saw it everyday from my favorite chair for months and I finally got fed up and in the stand it went.


I was too broke to list it for what I paid and too apathetic about it to do a complete tear down, so I made a list, poured an IPA, put on some John Lee Hooker and got to work.


Since grips had sidelined this project I thought I would tackle them first,  I got the grips from bike works off the bars and set them aside.  I'm still mad at them and didn't want to jinx the project by reusing them.  I had some rubber grips, still new in packaging that I think I had got for a 3 speed, which I decided to use instead.  I have learned since the 2015 fiasco that dish soap is your friend for mounting rubber grips.  It makes things slick but eventually evaporates. I coated the inside of the grip and lightly coated the bar and got them started...


And then I reached for the "persuader" to finish the job.


Grip problem solved!


At one point, early on I think, I removed an important part of the rack and the equally important hardware and instead of putting them in a baggie and taping them to the rack I put them down...somewhere.  I do not remember where and they are nowhere to be found, so I just removed the rack.  It was going to bug me anyway because they designed this bike with such a short seat tube that this particular rack was never going to be level.  I hate slanty racks.  


The bike also came with fenders but both front and back were rubbing on the tires and since fixing fender lines can take 20 minutes or 20 hours, I chose to just remove them.


The tires that came with the Mixte, as is often the case with vintage bikes, were dry rotted.  Normally I would go with some nice gum-wall tires but I didn't want to spend a penny more than necessary on this project, so I went with the Specialized Tri-Sports that I took off the Passage.  


I also used the saddle that came with the Passage as both it and the tires are basically new.


I really though I could get the Mixte up and running with out a penny out of pocket but it turns out I needed two mountain bike style brake cables (round end) and I only had one.


I have a whole box of cables and I had probably 5 or 6 road bike brake cables but only one with a mountain bike end.  Sigh..... off to the bike shop.


Dang, I forgot I can't go to the shop a mile away, it closed!  (sad trombone) I liked that place and the owner so I'm sorry they didn't last.  I ended up going to Bike Works and got the cable for $2.00, probably would have been cheaper on Amazon but I wanted it NOW and I like supporting Bike Works.


And so the Mixte is done.  It wasn't a complete tear down rehab, I didn't touch the bearings,  and the price and description will reflect that, but it is a functional bike.  And yes I know that a brown saddle and black grips is a fashion disaster but I don't care! I want it gone!!!

I ended up doing the following:

  • Wipe down frame and fork with armor all wipes
  • Sanded brake shoes
  • New grips
  • Newish tires and tubes (under 25 miles)
  • New saddle
  • New brake cables and housing
  • New RD cable and housing
  • Adjusted shifting 
  • Adjusted brakes
  • Gave the chain and FW a WD 40 spray and wipe down and lubed the chain.
  • Greased seat post and stem
It would be on CL right now except that I am heading out of town in the morning and I don't want to be the guy who lists something and then isn't around to show it.  My trip out of town is somewhat impulsive and involves a bike...(cue maniacal laughter).  More to come.


EDIT (3/38/18) after languishing on CL with the brown saddle for a few weeks I broke down and swapped to a sprung black one I had in the parts bin.  Will see if that and lowering the price from its already reasonable amount will shift it.